How to Maximize QGIS: Plugins, Python Automation, and More

Plugins for QGIS
What is QuickMapServices?
The QuickMapServices Plugin is the main provider of basemaps in QGIS Desktop. Because basemaps provide a point of reference, you can find everything from aerial photographs, and satellite images to OSM basemaps and data. From planning to development to tourism to education, you can use these basemaps in a lot of applications.
QuickMapServices provides high-resolution basemaps such as from Esri and Google. If you want to search for available basemaps, you can use some of the search functionality available in the plugin.
Whether you’re looking for a basemap with high-resolution imagery, elevation hillshade, or just a topographic reference map, then you should download QuickMapServices.
The search functionality allows you to find almost anything you need. Plus, it shows you the service availability and signals to know if it’s stable.
What is MMQGIS?
MMQGIS is a QGIS plugin that contains a collection of tools to simplify data manipulation. It's one of the top ten downloaded plugins and consistently gets high usage. It provides some capabilities that are not readily available in the Processing toolbox.
Features of MMQGIS
The MMQGIS Plugin contains seven toolsets that add core functionality. Each one comes with a set of tools to help you get the most usage out of QGIS.
Animate
It allows you to create frames so you can build simple animations in QGIS. The tool plots successive rows in a layer – or more than a single layer. This is an exemplary visualization common for showing vectors in a flow map such as the direction of goods traveled.
Geocode
The geocoding tools in MMQGIS are a major part of the reason why this plugin gets so many downloads. Turn your addresses into geocoded points. Or vice versa, you can convert your current point file into addresses.
Import/Export
These tools are designed for simple conversion between a few selected formats. Either you can work with CSV or KML giving functionality to import and export.
- Export attributes or geometry to CSV
- Import geometry from CSV
- Google Maps KML export
Modify
These tools are for modifying your existing data through geometry updates, field changes, or projecting features. You can also locate duplicate geometry or simplify features by aligning vertices to a grid.
Combine
This tool gives you a day of tools for integrating more than one dataset. Here are some of the algorithms that are a part of this toolset. Join attributes from CSV layer Merge layers to create a new output Spatial join that joins attributes based on location.
Search/Select
This is more of a user interface capability, where you can interactively browse through each record in a data source. Alternatively, you can set the search criteria and match the value based on that query.
Where can MMQGIS be Downloaded?
Link: https://plugins.qgis.org/plugins/mmqgis/
Extending QGIS Functionality with Python Automations
PyQGIS refers to the Python environment within QGIS. It allows users to automate workflow and extend QGIS with the use of Python libraries. But it’s not only Python core libraries.
You can also leverage thousands of third-party libraries adding functionality with scientific and data analysis. Python can be used with QGIS to manipulate GIS data and perform advanced analysis.
PyQGIS: Accessing and Utilizing the Python Console
One way to access PyQGIS is through the Python Console:
Plugins > Python Console
The first option is to write Python code line-by-line in the console. But the Python Console also has a script editor (IDE), which makes it easier to save and run scripts.
For example, you can write your own tools and mix various libraries installed in QGIS to extend it.
Exploring Algorithm History in PyQGIS: Learning from Pre-ran Tools
Every time you run a tool in QGIS, it also stores the history. But these pre-ran tools that you run also create a Python dictionary. One of the best ways to familiarize yourself with PyQGIS is by checking the code from your algorithm history.
Additionally, you can use this as a starting point for your own custom script. You can access the processing history by clicking the “clock” icon in the Processing Toolbox.
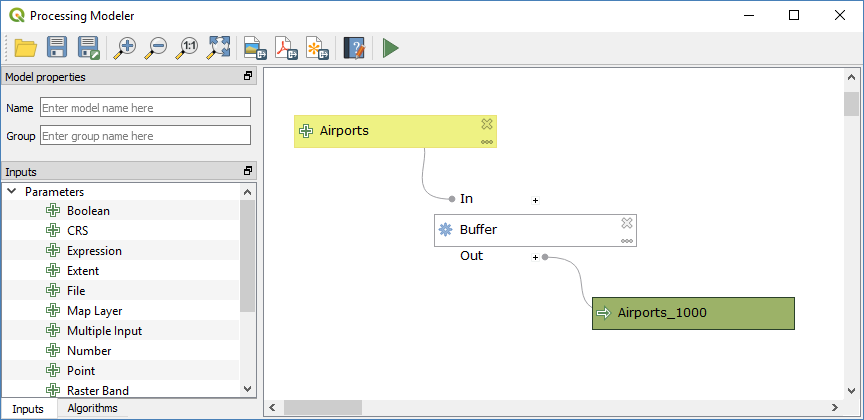
Building Repeatable Workflows in QGIS with the Graphical Modeler
The Graphical Modeler is a visual way to string different processing algorithms together. If you’re familiar with ArcGIS ModelBuilder, it’s similar but for QGIS. All you have to do is drop inputs, outputs, and algorithms to the interface.
Then, you connect them together sequentially in the order you want to run. This is how you build a repeatable workflow in QGIS. But you can also export the Graphical Model as a Python script. Again, this makes an excellent starting point for a script.
Creating Custom Python Algorithms in PyQGIS: Extending Processing Toolbox
If you go to the Processing Toolbox, you can find the Python icon. This is how you can build your own scripts, which will open the IDE. Alternatively, you can create a new script from a template.
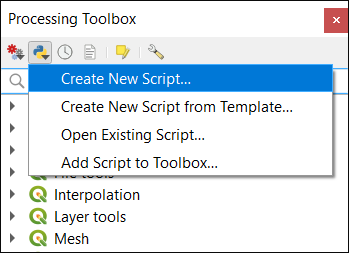
This pre-written code can help you save time writing your own processing tools. It’s easy to add an interface with the writing template. You can even make a plugin this way.
QGIS Field Data Collection
What is QField?
QField is an open-source solution for mobile data collection for Android, iOS, and macOS. It’s built by the QGIS team, which we rank as the second most popular GIS software today.
How to Use QField
Download Plug-in
The QField Sync plugin analyzes your project and suggests any actions to make sure the project works with QField. The plugin helps prepare and package a QGIS project so that it’s compatible with QField, Layers and base maps you want to use in the field.
Configure Project
Once you’ve added them, you can start to configure and set up your QGIS project. All the configurations will save to your current QGIS project.
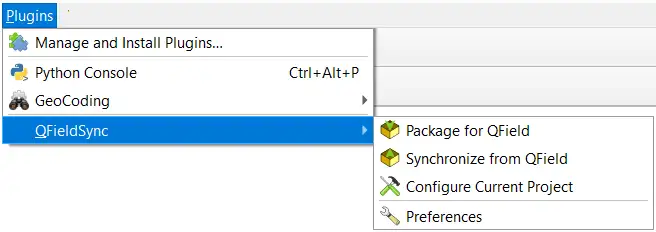
Plugins > QField Sync > Configure Current Project
Layer configuration
The layer configuration will control the layers that will belong to your fieldwork package.
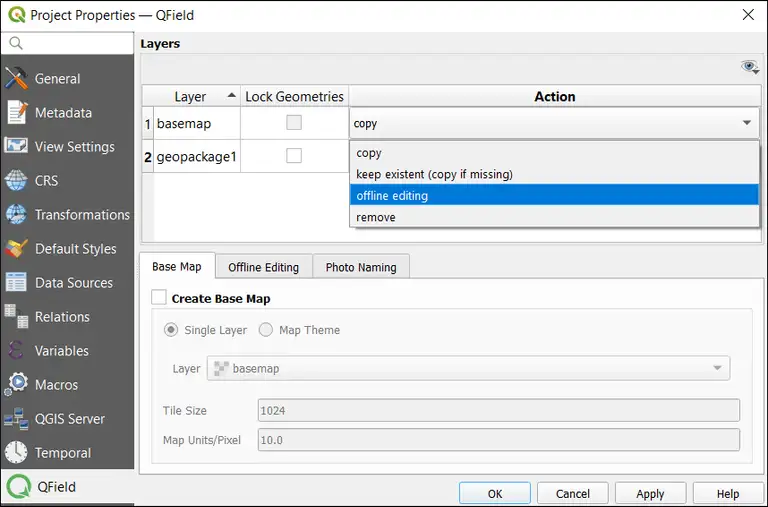
Basemap setup
The basemap serves as the underlying layer for your fieldwork. You can set it to your area of interest. You have two options for your basemap.
- Layer – This is a great option to generate an offline map of a WMS or raster layer like an ECW.
- Map theme

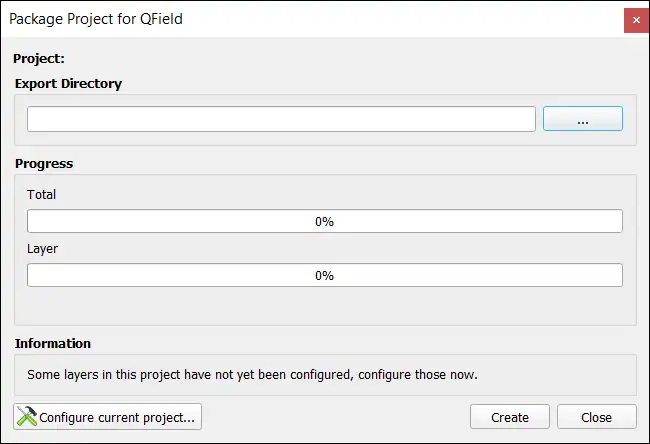
Create a QField package
QField syncs with your QGIS project so you can take it out to the field. But before you can take your QGIS project to the field, you have to create a QField package.
Plugins > QField Sync > Package for QField
QField Mobile App Setup
First, download the Android/iOS App from the Google Play store App Store. Next, you will have to upload the QField package to your mobile phone. When you go out to perform fieldwork, the QField package will contain all of the layer and basemap configurations.
Synchronize from QField
Once you finish data collection in the field, you can copy the data from your phone and overwrite the project. Any updates in the field including photographs will now become part of the project.
Datasets can be locally stored or accessed remotely. One of the services that you can use for data collection is QField Cloud. This type of setup allows you to seamlessly work in sync as a team with more efficiency.
Webmapping with QGIS2Web
What is QGIS2Web?
QGIS2Web takes your desktop GIS so you can publish it interactively for the web. If you have your own server, then this plugin creates all the supporting files you need without any server-side software installed.
Not only does it replicate the symbology and cartographic aspects of your current QGIS Desktop, but you have the option to export a web map to either OpenLayers, Leaflet, or Mapbox GL JS.
Additionally, you can set the web map to have popups, clusters, and a variety of properties and widgets to make them more appealing to your audience.
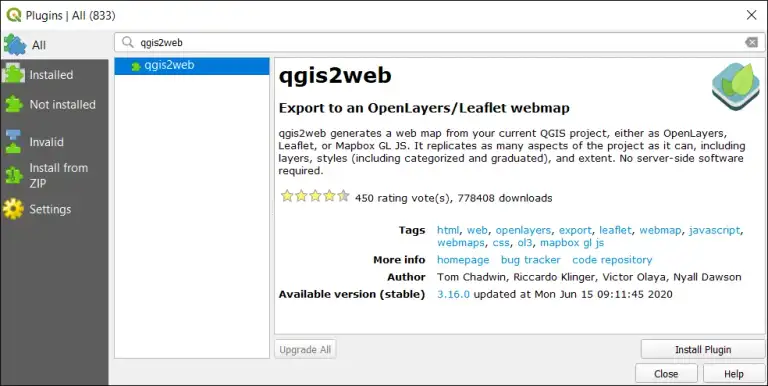
Install the QGIS2Web Plugin
First, you need to download and install the QGIS plugin. You can download a plugin by going to the “Plugins” menu at the top of QGIS Desktop.
Plugins > Manage and Install Plugins…
Search for the QGIS2Web plugin. Once you find the plugin in the repository, download, install, and activate it.
How to use the QGIS2Web Plugin
Basically, the purpose of this plugin is to take all of the layers in your map and create all the supporting files to build a web map. If you have your own server, then all you have to do is upload them.
To access the QGIS2Web plugin, you will be able to find it in the top horizontal menu under “Web”.
Web > QGIS2Web > Create web map
This will prompt a form that you need to fill in. There is a whole of customizations that are available including the following:
- Layers and groups to display
- A radio button for either OpenLayers or Leaflet type of map
- Basemap choice
- Data export path
- Popup fields labels
- Scale/zoom levels
In addition, there are several widgets available as well to add to your web map. For example, this includes everything from a measuring tool, layer search, layer list, address search, show pop-ups, and highlight on hover.
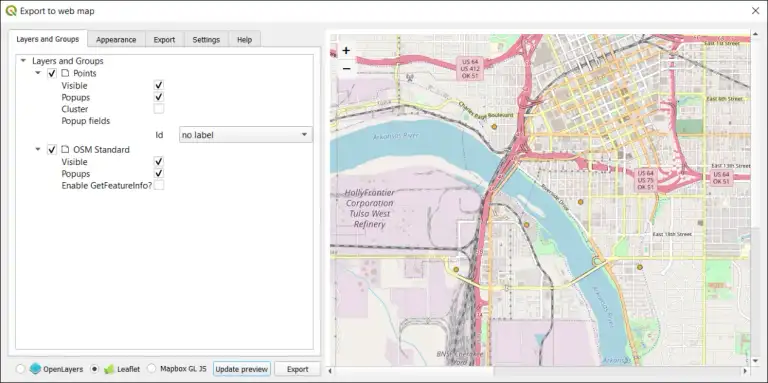
Once you’re OK with all the settings, click “Export”. Next, it will build a web map package to the folder location you select. After it finishes exporting, it packages all the contents and settings you selected into a folder.
The folder contains all of the supporting files and folders. For example, it also contains any images, layers, resources, and styles. But it also has an index file, which has all of the HTML that gets presented on the screen.
If you double-click the index.html file, this will open your browser and display everything from your setup from the QGIS2Web plugin. From here, you will have to upload the contents from QGIS2Web into your web server so the public can view your new web map.